2013/12/12 update: 資料整理 Author : 一心の流 (Alex Chung)
1)新增 Rockchip-Hardware-Info(wiki)
2)Kernel repositories
1)新增 Rockchip-Hardware-Info(wiki)
2)Kernel repositories
3)Rockchip kernel source 1080p fix
4)HOWTOs
5)Other Sites with Useful Information
新增Data Sheet: (RK30XX Technical Reference Manual l, 1142 page, 26MB) 請至下面連結下載
RK3188 Radxa Rock 開發版 for Android and Linux (含電路圖) + Android 4.2.2 SDK v1.0.0-130514
新增Data Sheet: (RK30XX Technical Reference Manual l, 1142 page, 26MB) 請至下面連結下載
Rockchip RK3066 reference design and source code of Android 4.04
RK3188 Radxa Rock 開發版 for Android and Linux (含電路圖) + Android 4.2.2 SDK v1.0.0-130514
As previously mentioned, work was in progress to design development boards based on Rockchip processors. Radxa Rock and Radxa Rock Lite, 2 boards powered by Rockchip RK3188, are now available to early developers, and the final versions will soon be broadly available.
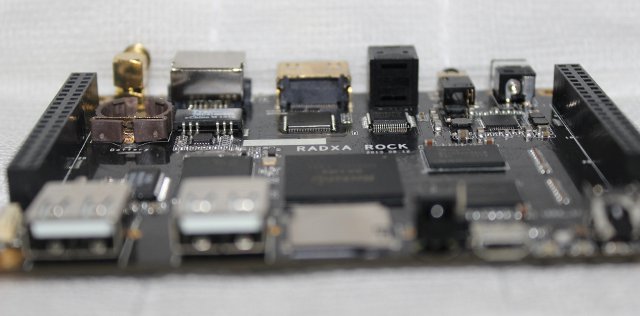
Radxa Rock Engineering Sample


Hardware specifications:
SoC – Rockchip RK3188 ARM Cortex-A9 quad core @ 1.6Ghz + Mali-400 MP4 GPU
System Memory – 2GB DDR3 @ 800Mhz (1GB DDR3 @ 800Mhz for Lite version)
Storage – 8GB Nand Flash (4GB Nand Flash for Lite version) + micro-SD SDXC up to 128GB
Video Output – HDMI 1.4 up to 1080p@60hz, andAV output
Connectivity:
10/100M Ethernet port
WIFI 150Mbps 802.11b/g/n with antenna
Bluetooth – Bluetooth 4.0 (Not in Lite version)
Audio I/O – Audio S/PDIF, headphone jack
USB – 2x USB 2.0 host port, micro USB OTG
Debugging – Serial Console
Misc – IR sensor, power key, recovery key, reset key, 3 LEDs, RTC
Expansions Header -80-pins including GPIO, I2C, SPI, Line in, USB 2.0, PWM, ADC, LCD, GPS… etc
Very nice specs but, to me, what makes this board unique is the expansion headers where you can directly plug and access devices through I2C, SPI, UART, ... there is even an LCD output as well as another USB port at those pins!
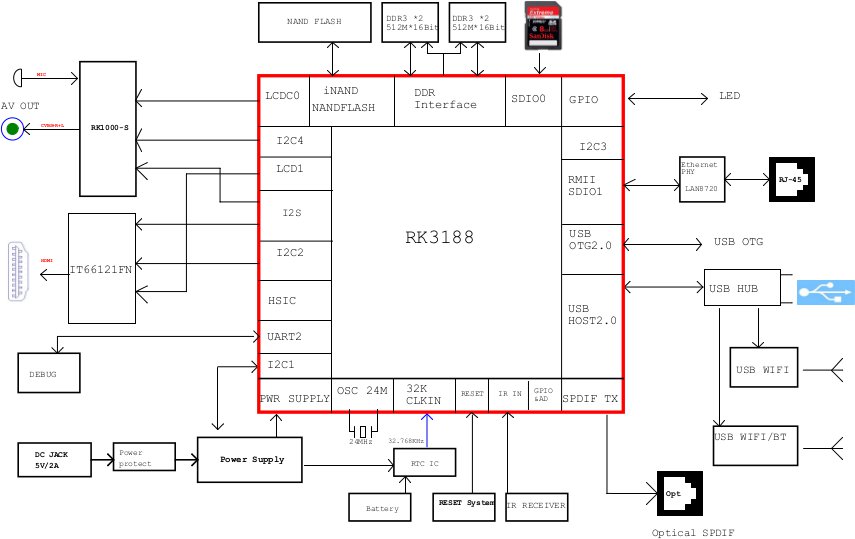
Radxa Rock Block Diagram (Click to Enlarge)
The boards will support both Android and Linux. The latter with limitations such as lacking video hardware acceleration (VPU), at least until some workaround (libhybris?) are found.
Download The early schematics (PDF,version :20130903) can also be downloaded for reference.
(上一版reference design)
There are currently 100 working samples that early developers can acquire for half price now. The final retail is not fully confirmed, but I’ve been told Radxa Rock should go for $89, and Radxa Rock Lite for $69, which look like decent prices.
You can find more information and pre-order (register interest) on radxa.com.
After screwing in the protective top/bottom methacrylate plastics you will need a power adapter and an HDMI cable (normal size connector, not mini/micro) to attach it to a display and be ready to boot.
When you power the board for the first time it boots into Android, scaled 720p and in English, version 4.2.2 with kernel 3.0.36+ based on RK3188 R-BOX Android 4.2.2 SDK v1.0.0-130514.
However, beware, there is no Google Play, so you're on your own to install apps.
A board red LED will light immediately, give it 2 seconds (or it'll boot Android) and, then, you can release the pushbutton and go to your PC.
I'm supposing you're on Linux, so if you go to a Terminal and write "lsusb" you'll see a new nameless device with ID: 2207:310b which corresponds to a RK3188 SoC awaiting flashing instructions.
IMPORTANT TIMEOUT: This recovery mode for flashing powers off after 2 minutes from last flash operation or from being plugged in (if you do no operations). So it will issue a "power off" command through the serial console and just disappear from "lsusb" output. You'll have to re-plug it again to access it.
Then, through the usual Windows RK-provided tool or with the Linux rkflashtool that you can download and compile with ease from: https://github.com/Galland/rkflashtool_rk3066 (I know, worst name ever, it does handle RK29* and RK31* too).
So download and compile the Linux USB flashing tool:
Hence, once you have downloaded/compiled your Linux kernel and have a Ubuntu rfs (root file system) in your uSD, you can go ahead and flash your Linux kernel with these simple commands:
I'll initially be using my most up to date kernel for booting Linux, so you may see some activity there:
https://github.com/Galland/Linux3188
download:
https://github.com/Galland/rkflashtool_rk3066/archive/master.zip
Rkflashtool_rk3066
(rkflashtool with RK3066 and RK3188 support. To backup the system and flash images from Linux.)
rkflashtool with RK3066 support. To backup the system and flash images from Linux.
flash_kernel tool
WARNING: you MUST follow these instructions to tailor the script BEFORE executing it or you may BRICK YOUR DEVICE. In any case, use at your own risk!
Tailoring the script to your particular device's recovery partition's location:
Compile rkflashtool by typing in a terminal: make
Type in the terminal the command: lsusb
Connect one end of the USB cable to your PC
Press the reset button using a paperclip, and while pressed, connect the USB cable to the OTG USB port
Release the reset button
To make sure the above steps were done right, type in a terminal: lsusb
You can flash if you see a new device (compare with previous lsusb) with ID: 2207:300a
Run the following (root) command: sudo ./rkflashtool r 0x0 0x2000 > parm.bin
And then this command: cat parm.bin
In the output look for "(recovery)" and note well the numbers that precede it. In my case it was: ",0x00008000@0x00010000(recovery)," (notice the @ character separating the two hex numbers)
Modify the flash_kernel.sh script's first line ("rkflashtool w 0x... 0x... < recovery.img) to use the two numbers above, BUT SWAPPED (first the hex number after the @, followed by the one before it). In my case that meant leaving the line as: sudo ./rkflashtool w 0x10000 0x8000 < recovery.img
Make the script executable by typing in the terminal: chmod +x flash_kernel.sh
Once you have compiled a kernel (see http://hwswbits.blogspot.com.es/2013/03/compiling-picuntu-kernel-ubuntu-linux.html) and used mkbootimg to generate a recovery.img file, these are the flashing instructions using a Linux PC (use at own risk!):
Connect one end of the USB cable to your PC
Press the reset button using a paperclip, and while pressed, connect the USB cable to the OTG USB port
Release the reset button
Run "./flash_kernel.sh" to flash the kernel to the recovery partition
When ready, the stick will be rebooted automatically
These steps are from Omegamoon's work. You can see more at: https://github.com/omegamoon/rockchip-rk30xx-mk808
3D model of radxa rock
Download The early schematics (PDF,version :20130903) can also be downloaded for reference.
(上一版reference design)
There are currently 100 working samples that early developers can acquire for half price now. The final retail is not fully confirmed, but I’ve been told Radxa Rock should go for $89, and Radxa Rock Lite for $69, which look like decent prices.
You can find more information and pre-order (register interest) on radxa.com.
First boot
After screwing in the protective top/bottom methacrylate plastics you will need a power adapter and an HDMI cable (normal size connector, not mini/micro) to attach it to a display and be ready to boot.
When you power the board for the first time it boots into Android, scaled 720p and in English, version 4.2.2 with kernel 3.0.36+ based on RK3188 R-BOX Android 4.2.2 SDK v1.0.0-130514.
However, beware, there is no Google Play, so you're on your own to install apps.
Hack it!
If you want to tinker with it, nothing easier, turn it off, unplug power and then: while keeping pressed the Recovery push-button nearby the USB ports, plug the OTG USB port to your PC.A board red LED will light immediately, give it 2 seconds (or it'll boot Android) and, then, you can release the pushbutton and go to your PC.
I'm supposing you're on Linux, so if you go to a Terminal and write "lsusb" you'll see a new nameless device with ID: 2207:310b which corresponds to a RK3188 SoC awaiting flashing instructions.
IMPORTANT TIMEOUT: This recovery mode for flashing powers off after 2 minutes from last flash operation or from being plugged in (if you do no operations). So it will issue a "power off" command through the serial console and just disappear from "lsusb" output. You'll have to re-plug it again to access it.
Then, through the usual Windows RK-provided tool or with the Linux rkflashtool that you can download and compile with ease from: https://github.com/Galland/rkflashtool_rk3066 (I know, worst name ever, it does handle RK29* and RK31* too).
So download and compile the Linux USB flashing tool:
git clone https://github.com/Galland/rkflashtool_rk3066 rkflashtoolAsk the Radxa board about its partition sizes and offsets:
cd rkflashtool
sudo apt-get install libusb-1.0-0-dev
gcc -o rkflashtool rkflashtool.c -lusb-1.0 -O2 -W -Wall -s
sudo ./rkflashtool r 0x0 0x1 | head -n 11the result should be:
FIRMWARE_VER:4.1.1
MACHINE_MODEL:rk31sdk
MACHINE_ID:007
MANUFACTURER:RK31SDK
MAGIC: 0x5041524B
ATAG: 0x60000800
MACHINE: 3066
CHECK_MASK: 0x80
KERNEL_IMG: 0x60408000
#RECOVER_KEY: 1,1,0,20,0
CMDLINE:console=ttyFIQ0 androidboot.console=ttyFIQ0 init=/init initrd=0x62000000,0x00800000 mtdparts=rk29xxnand:0x00002000@0x00002000(misc),0x00005000@0x00004000(kernel),0x00007000@0x00009000(boot),0x00010000@0x00010000(recovery),0x00020000@0x00020000(backup),0x00040000@0x00040000(cache),0x00200000@0x00080000(userdata),0x00002000@0x00280000(kpanic),0x00100000@0x00282000(system),-@0x00382000(user)
What does this tell us?
Well, for us Linux developers, used to sharing sticks' space with Android (unless you decide to wipe it and make your Linux take over the flash...) we are bound to flashing our kernels into the "recovery" partition so that we can dual boot Android or Linux by having the latter's filesystem in a MicroSD (also called uSD) card.
And then, from above parameters, where each partition is described as:
partition_size@partition_offset(partition_name)
we infer that our "recovery" partition is at 0x10000 and has a size of 0x10000
Please remember that the flashing tool requires these numbers in reversed position (first the offset, then the size), like sudo ./rkflashtool r (offset) (size)
Hence, once you have downloaded/compiled your Linux kernel and have a Ubuntu rfs (root file system) in your uSD, you can go ahead and flash your Linux kernel with these simple commands:
sudo ./rkflashtool w 0x10000 0x10000 < my_kernel_recovery.imgThe "b" command safely reboots the RK device when the flash is written.
sudo ./rkflashtool b
I'll initially be using my most up to date kernel for booting Linux, so you may see some activity there:
https://github.com/Galland/Linux3188
download:
https://github.com/Galland/rkflashtool_rk3066/archive/master.zip
Rkflashtool_rk3066
(rkflashtool with RK3066 and RK3188 support. To backup the system and flash images from Linux.)
rkflashtool with RK3066 support. To backup the system and flash images from Linux.
flash_kernel tool
WARNING: you MUST follow these instructions to tailor the script BEFORE executing it or you may BRICK YOUR DEVICE. In any case, use at your own risk!
Tailoring the script to your particular device's recovery partition's location:
Compile rkflashtool by typing in a terminal: make
Type in the terminal the command: lsusb
Connect one end of the USB cable to your PC
Press the reset button using a paperclip, and while pressed, connect the USB cable to the OTG USB port
Release the reset button
To make sure the above steps were done right, type in a terminal: lsusb
You can flash if you see a new device (compare with previous lsusb) with ID: 2207:300a
Run the following (root) command: sudo ./rkflashtool r 0x0 0x2000 > parm.bin
And then this command: cat parm.bin
In the output look for "(recovery)" and note well the numbers that precede it. In my case it was: ",0x00008000@0x00010000(recovery)," (notice the @ character separating the two hex numbers)
Modify the flash_kernel.sh script's first line ("rkflashtool w 0x... 0x... < recovery.img) to use the two numbers above, BUT SWAPPED (first the hex number after the @, followed by the one before it). In my case that meant leaving the line as: sudo ./rkflashtool w 0x10000 0x8000 < recovery.img
Make the script executable by typing in the terminal: chmod +x flash_kernel.sh
Once you have compiled a kernel (see http://hwswbits.blogspot.com.es/2013/03/compiling-picuntu-kernel-ubuntu-linux.html) and used mkbootimg to generate a recovery.img file, these are the flashing instructions using a Linux PC (use at own risk!):
Connect one end of the USB cable to your PC
Press the reset button using a paperclip, and while pressed, connect the USB cable to the OTG USB port
Release the reset button
Run "./flash_kernel.sh" to flash the kernel to the recovery partition
When ready, the stick will be rebooted automatically
These steps are from Omegamoon's work. You can see more at: https://github.com/omegamoon/rockchip-rk30xx-mk808
3D model of radxa rock
gustaf posted in our google group that he wanted to make a 3D model of our rock board. And we provided the datasheets of the connectors. Now he finished it. It’s really awesome! Thank you, gustaf.
Click the image or here to view more pictures of the rendering.

其他資訊:
Rockchip hardware Info: (引用linux-Rockchip_Info WIKI)
Collection of information for different hardware with Rockchip SoCs. Tablets, Android sticks, Media boxes, Development boards. Pictures of the PCBs, hardware hacks, how/where to attach UART console etc.
[+] Rk3066 Hardware
[+] Rk3188 Hardware
[+] Set top box
[+] TV stick
Kernel repositories
You will need appropriate toolchain gcc for crosscompiling the linux 3.0.x sources. gcc up to 4.6.2 should work for rk29xx sources and gcc up to 4.4.4 should work for rk30xx/31xx sources. gcc 4.6.3 from Ubuntu 12.04 seems to work also. Unfortunately not all available toolchains work under all Linux systems.
Linux on Rockchip devices has no configuration mechanism.
The layout of your board - eg. what peripherial is connected to which pin - is stored in arch/arm/mach-rk??/board-*.c
There should be also corresponding arch/arm/configs/*_defconfig
To build a kernel for your device you need to find a repo which has the correct board file. This is specially important for tablets which have different screen resolution, different peripherials, etc.
https://github.com/crewrktablets , configs for Odys Loox, Xpress, Next, NEO X8, NEO X7, BQ-Kepler2, BQ-Pascal2, Arnova AN8CG3, M820c3G, Hyundai H900, Meying M11HD
https://github.com/omegamoon ,configs for MK808 (RK3066) and MK908 (RK3188) TV sticks
https://github.com/vurrut , config for BQ-Pascal and others
https://github.com/joaquimorg , config for BQ-Pascal2 and others
https://bitbucket.org/paulobrien/android_kernel_andypad/src , config for Andypad
https://github.com/jhonxie/android_kernel_p81hd , config for teclast P81HD
https://github.com/eldiau/android-kernel-mediacom-mp810c , config for Mediacom mp810c
https://github.com/aloksinha2001/Linux3188/ , config for RK3188 - PicUntu
https://github.com/galland/Linux3188/ , defconfigs for Picuntu in RK3188 stick Cozyswan S400
Rockchip kernel source 1080p fix
Unfortunately all kernel souce code snapshots released up to the current date (Aug 2013) contain a display bug that disables 1080p resolution on most PC monitors, due to an outdated parsing of the EDID (the monitor capabilities information).
This bug was patched long ago in the Linux kernel but needs to be applied to any source code released by Rockchip to ensure 1080p on all modern PC displays.
For reference, see the patch to RK kernel.
HOWTOs
Other Sites with Useful Information
- http://www.cnx-software.com , RK30xx/RK31xx hacking timeline:
- http://www.cnx-software.com/2012/11/04/rockchip-rk3066-rk30xx-processor-documentation-source-code-and-tools/
- http://www.cnx-software.com/2013/06/21/rockchip-rk3066-is-now-part-of-mainline-linux-kernel/
- http://www.cnx-software.com/2013/07/12/linux-rockchip-developers-community-up-rockchip-development-boards-coming-soon/
- http://www.cnx-software.com/2013/08/10/mk908-rockchip-rk3188-mini-pc-android-4-2-2-sdk-leaked/
- http://www.cnx-software.com/2013/08/20/rockchip-rk3066-android-4-2-2-hdmi-tv-stick-sdk-leaked/
- http://www.cnx-software.com/2013/09/07/radxa-rock-development-boards-with-rockchip-rk3188-are-available-for-developers-now/
- http://www.omegamoon.com/blog/
- http://crewrktablets.arctablet.com/
- http://hwswbits.blogspot.com/
Contact
IRC
#linux-rockchip on freenode
沒有留言:
張貼留言
注意:只有此網誌的成員可以留言。